# Migrating from Soundslides 1.x
# Importing a Soundslides 1 show
In addition to creating new shows from scratch, you can also upload slide shows created with Soundslides 1. For this, you will need a zipped copy of your project's publish_to_web directory.
If your project has a publish_to_web directory, you can zip it manually and import it into Soundslides 3.
After you have your zip file:
- From account's show list, create a new show by clicking the "Create new show +" button at the top of your show list page.
- Click the "Import existing show" button.
- Click "Browser", and select your publish_to_web.zip file from your computer.
- Click "Begin upload"
After your upload is processed, you will see your show in your account's show list.
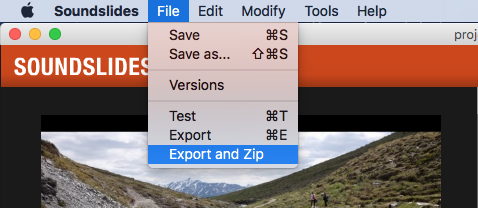
If you do not have a publish_to_web directory, but you still have a working copy of Soundslides or Soundslides Plus on your computer, open your project in Soundslides 1, then select Export and Zip from the File menu. Then follow the steps above.
# Limitations with non-audio formats
Legacy non-audio shows from Soundslides Plus do have limitations when importing. Non-audio slide shows can be hosted by Soundslides 3, but can not be edited. Soundslides 3 requires an audio file for editing and exporting to video.
Legacy non-audio shows are limited to hosting functions only. You can set the privacy of your show, and get the link and embed code for your show.
In other words, non-audio shows are imported "as-is" and can not be modified once imported.
Bulk conversion of shows
If you have a large number of legacy Soundslides shows to import and convert, please reach out to us. We have converted thousands of legacy archival Soundslides projects over to modern non-Flash formats, and we'd love to help. We don't want old slide shows to disappear just because Adobe walked away from Flash.
# Modernizing self-hosted Flash-based Soundslides shows
You can upgrade old Flash-based Soundslides shows by copying in one new HTML file.
Here’s a screencast demonstrating the process.
# What does this new HTML file do exactly?
This HTML file allows you to upgrade your published slide show to the latest version of the Soundslides Player by replacing your slide show’s main HTML file. The new file contains all of the javascript and css needed to render an old show’s contents in the latest Soundslides Player.
# This upgrade will work if your slide show meets the following criteria:
- Your slide show was originally created in Soundslides 1 or Soundslides Plus 1.
- Your slide show is hosted on a web server.
- You have access to copy/replace an HTML file in your show’s directory on that web server.
# How to upgrade your show manually
- Download the new HTML file and unzip it.
- Copy the file (named soundslides3.html) into your slide show’s directory online.
- Now view your slide show online using the soundslides3.html file.
- If everything looks ok, make a backup of your show’s index.html file and iframe.html file, then replace both of those files with a copy of soundslides3.html.
Here’s a screencast demonstrating the process.